
How to Drill Tile?
Posted by Joseph Strong on 17th Jun 2025
How To Drill Tile Without Chips and Cracks
Tile can be a bear to drill. It's hard, it chips, it cracks easily, and there’s always another material hiding underneath. In this guide, we’ll cover the different tile types, what’s behind them, and how to drill clean holes without ruining your project. We’ll also break down the best bit options and why the Bad Dog Multipurpose Bit is the bit we choose to drill tile.
Types of Tile
Before you put a drill to tile, it's important to know what you're working with. Here are some common types and how to identify them:
-
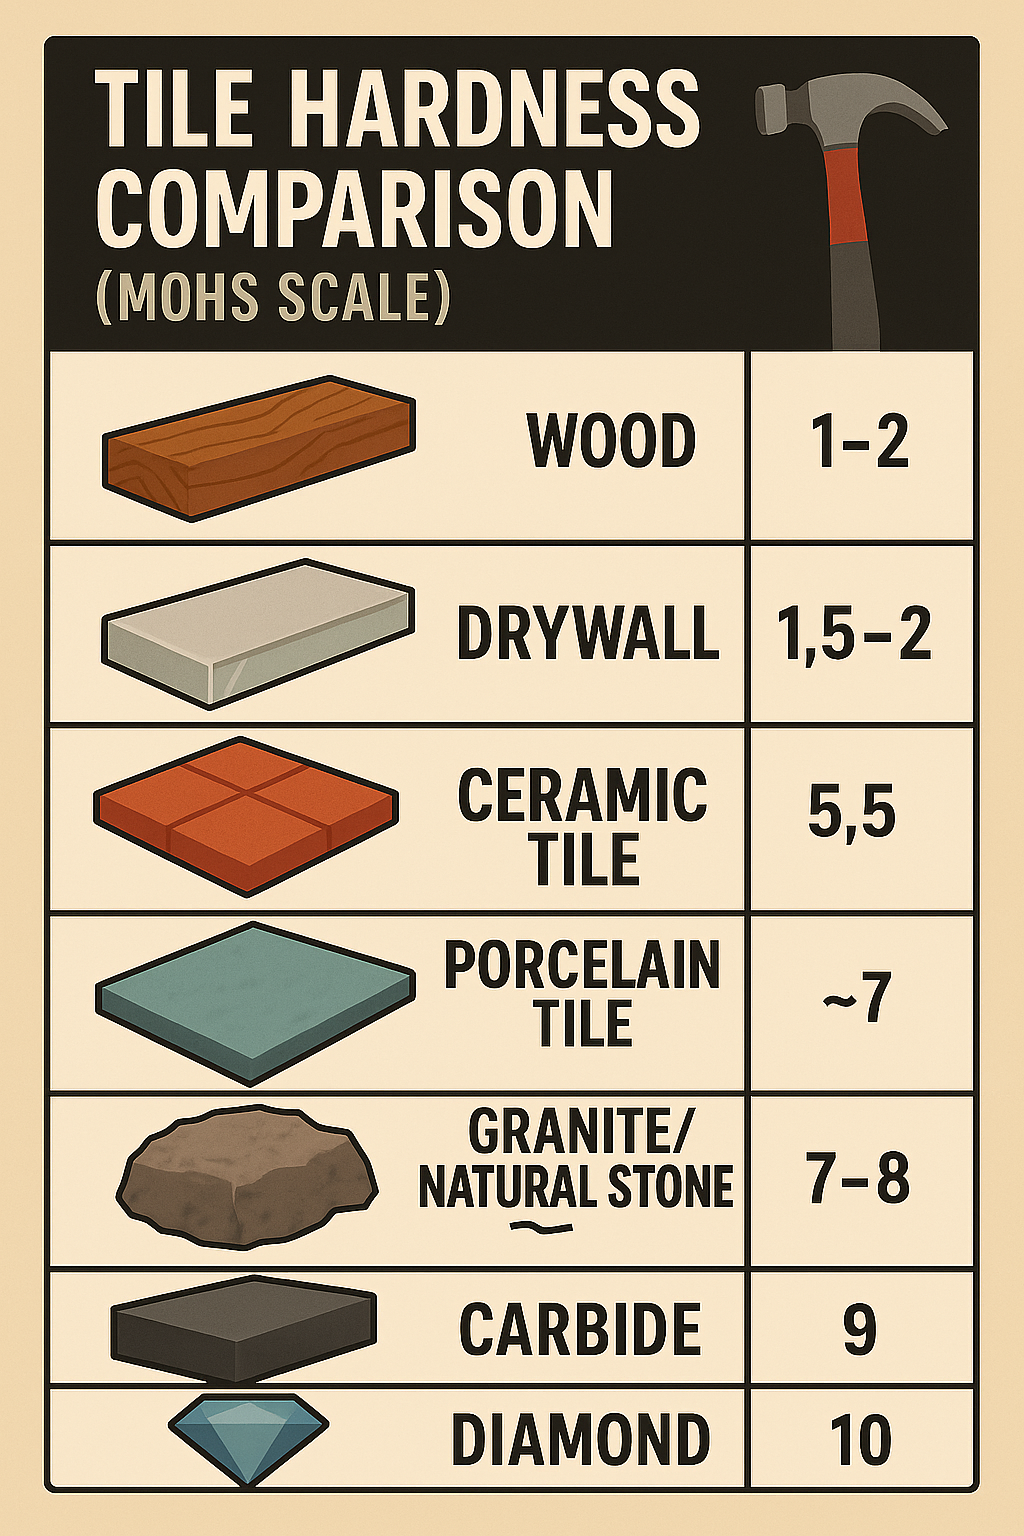
Ceramic Tile: Often used on walls and kitchen backsplashes. Available in a wide range of colors, ceramic tile typically has a glossy glazed surface and a red or white base underneath. The back of the tile has a rough, porous texture. Ceramic and porcelain tile are often mistaken for one another, but ceramic is the softer and less dense of the two. An easy test to determine if you're working with ceramic tile is to scratch a spare tile with a utility knife; ceramic will scratch and porcelain typically won't. At 5.5 on the Mohs hardness scale, Ceramic tile is relatively soft and easy to drill.
-
Porcelain Tile: Much denser and harder than ceramic tile, porcelain is ideal for floors and high-traffic areas. Porcelain tile is also a great choice for wet areas like bathrooms, showers, and even outdoor installations due to its low water absorption rate. To differentiate from ceramic tile, look for chips. Porcelain has a uniform color throughout the body, while ceramic tile is typically white or red under the surface glaze. Porcelain is also heavier than ceramic tile, with a smooth texture on the reverse. Porcelain tile is around 7 on the Mohs scale, making it one of the most difficult materials in your home to drill.
-
Glass Tile: Often found in mosaics and backsplashes, glass tile is typically glossy and translucent. At 6 on the Mohs scale, glass is softer than porcelain and harder than ceramic. Glass is very brittle; drilling requires slow speed and extra care to prevent chipping.
-
Stone Tile: There are thousands of varieties of natural stone, each with its own characteristics and use cases. Natural stone has a distinct texture and veining, but many porcelain tiles mimic the look. To determine if you're working with natural stone, check the edges—stone tiles usually have sharp, clean edges, while porcelain is often beveled or rounded. While most stones are softer and easier to drill than porcelain, granite and other dense stones are very hard and can be difficult to drill.
What's Behind the Tile?
In the real world, tile is always mounted to something. In bathrooms, that something is usually cement board, chosen for its durability and moisture resistance. In kitchens, tile is more commonly installed over plywood or drywall. Behind any wall, there are also structural elements like wood or metal studs.
So when you're drilling through tile, you're rarely just drilling tile. You're also going through the backing material and whatever framing material lies beneath.
Types of Drill Bits for Drilling Tile
Tile is brittle but very hard. Traditional high-speed steel and cobalt drill bits used for metal and wood dull quickly on tile because they are. There are three primary options for drilling holes in tile:
-
Bad Dog Multipurpose Bit
-
Pros: Drills through everything—ceramic, porcelain, glass tile, plus common backing materials like cement board, plywood, and wood or metal studs. No bit swapping needed. Lifetime Guaranteed against dulling and damage.
-
Cons: None for typical tile jobs; it's designed for this kind of work. Note: maximum diameter available is 1 1/4", which covers most mounting and fixture applications. For larger holes, pair with a diamond cutting wheel like the HDII.
-
-
Carbide Glass and Tile Bit
-
Pros: Commonly available. Works well on ceramic tile and glass.
-
Cons: Struggles with some porcelain, depending on the quality of the tip. Also, the edge is not suitable for drilling backing materials like cement board or plywood.
-
-
Diamond Hole Saw
-
Pros: Makes clean holes in ceramic, porcelain, and glass tile.
-
Cons: Very difficult to start a hole; has a tendency to walk and damage the tile surface. The less aggressive diamond cutting edge is also not suitable for cutting some backing materials, like plywood, or for drilling structural elements such as wood or metal studs.
-
Comparison Chart
| Material | Bad Dog Multipurpose Bit | Diamond Hole Saw | Glass & Tile Bit |
|---|---|---|---|
| Ceramic Tile | ✅ Good | ✅ Good | ✅ Good |
| Glass | ✅ Good | ⚠️ Okay | ✅ Good |
| Porcelain Tile | ✅ Good | ✅ Good | ⚠️ Okay |
| Cement Board | ✅ Good | ✅ Good | ❌ No |
| Fiberglass Pan | ✅ Good | ✅ Good | ❌ No |
| Wooden Stud | ✅ Good | ❌ No | ❌ No |
| Metal Stud | ✅ Good | ❌ No | ❌ No |
Glass and tile bits do a solid job on 'softer' materials like ceramic and glass, but struggle in porcelain and fail completely on common layered backing materials.
Diamond hole saws are great for clean cuts in tile and glass, but they are difficult to start without a lot of practice and don't work on some common backing materials like wood or metal studs.
Bad Dog Multipurpose Bits are the only option in this lineup that can handle everything - from tile to what’s behind it - without switching tools. Plus, they are backed by our lifetime guarantee.
How to Drill Ceramic Tile
Ceramic tile is soft and easy to drill. Any of the bits mentioned above—glass and tile bit, diamond hole saw, or Bad Dog Multipurpose Bit—will work well. It’s forgiving and rarely cracks if you drill with moderate pressure.
Tips:
-
Use light pressure and moderate speed ~ 650 rpm.
-
Water isn't usually necessary unless you're using a diamond hole saw. Ceramic tile drills quickly, so heat typically doesn’t build up enough to risk cracking.
-
To guarantee an accurate starting position with your Bad Dog Multipurpose Bit or standard Glass and Tile Bits. Before starting your hole, use the tip of the drill bit to break the glaze and create a small divet where you intend to make your hole. This will prevent the bit from wandering when you start drilling. ~ You can also use a small piece of tape over your desired hole location for this purpose.
-
For diamond hole saws to prevent walking and ruining your material, start at an angle so just one part of the saw is touching the surface. Once a small divet is made, gradually reposition the saw until it is perpendicular to the material and the full wheel is in constant then finish the hole as usual.

How to Drill Glass Tile
Glass tile is harder and much more brittle than ceramic tile. You’ll need to drill slowly and carefully to avoid cracking or chipping around the hole. A traditional glass and tile bit or Bad Dog Multipurpose Bit is your best bet because they can be started perpendicular to the material and file their way in diamond holesaws are very prone to chipping glass tile.
Tips:
-
Drill at a very slow speed to avoid chipping the brittle glass surface.
-
Apply painter’s tape over the drilling area to help prevent surface splintering.
-
Use only light, steady pressure—let the bit do the work.
-
Always cool the area with water to reduce heat and avoid cracking or surface damage.
-
Begin drilling with the bit at a 90° angle—the sharp point of the Bad Dog Bit helps prevent walking, unlike a diamond hole saw.
How to Drill Porcelain Tile
Porcelain tile is extremely hard and difficult to drill. A standard glass and tile bit will often struggle depending on how hard the carbide is. The carbide, titanium, and cobalt blend used in our Bad Dog Multipurpose Bit is specifically engineered to handle hard materials like porcelain. The Diamond on a Diamond holesaw is even harder, but starting a diamond hole saw is even more difficult on the surface of porcelain. Whatever bit you use, patience is key. Use light pressure, low speed, and plenty of water to keep it cool.
Tips:
-
Start at a low speed to help the bit bite into the dense surface of porcelain tile without skipping.
-
Once the bit is seated and stable, gradually ramp up to around 300 RPM for optimal cutting performance.
-
Maintain light, steady pressure - pressing too hard risks cracking the tile.
-
Always use water to cool the tile. This reduces friction, keeps the tile from heat-hardening, and helps flush out debris.
-
Periodically, back the bit out of the hole to clear the chips. Flushing deeper holes with water helps, too.
-
For diamond holesaws, use the same angled start technique outlined in the ceramic tile section.
How to Drill Stone Tile
Drilling stone tile varies depending on the material—soft stones like marble and slate are relatively easy to drill, while dense stones like granite can be extremely challenging.
Tips:
-
Use a high-quality bit suited to stone, like the Bad Dog Multipurpose Bit
-
Use a high RPM with light, consistent pressure—most stone handles heat better than tile, and higher speed helps reduce chipping. Always keep the bit cool with water and back it out periodically to clear dust.
-
Use water to keep dust down and flush out debris from the hole.
-
For dense stones like granite, be prepared for longer drilling times and keep your bit sharp.
-
On thicker stones (over ~1in), consider switching to hammer action on your drill after making some progress into the material. Most stones are more resistant to fracturing than tile, and hammer action will significantly speed up the drill. Note that hammer action will also cause a blowout at the back of your hole.
There are so many varieties of stone that we'll cover drilling it in detail in a future article, but these tips will get you started.
A Note on Cooling
Not every drill bit requires water cooling in every material, but when it comes to tile, it’s always a good idea. Using water helps keep the tile cool, which prevents heat-related cracks and surface re-glazing. Water also helps keep dust down and makes clean-up easier. Pros use a spray bottle, but a sponge, or even a water bottle, works. Avoid using oil or other lubricants, as they can permanently stain porous tile surfaces.
Real-World Drilling Scenarios
You’ll find tile in more places than you think—and nearly all of them have layers underneath that turn a simple job into a serious challenge. This is where the Bad Dog Multipurpose Bit shines:
-
Mounting towel bars, grab bars, or shelving in bathrooms. Typically involves drilling through porcelain or ceramic tile, cement board, and wood or metal studs
-
Installing outlets and fixtures into kitchen backsplashes. Requires drilling through ceramic or glass tile, plywood, and sometimes stud framing.
-
Running plumbing through tiled shower walls or laundry rooms. Will require drilling through porcelain tile, cement board, and wood or metal studs.
-
Anchoring fireplace mantels or mounting brackets through decorative tile. Every fireplace is different, but it may include stone tile (like slate, quartzite, marble, or granite), cement board, plywood, masonry, or wood.
-
Building out outdoor kitchens or patios with tiled surfaces. Commonly involves porcelain or stone tile over cement board or concrete with a wood frame underneath.
You never really know what’s behind the tile until you drill into it, but with Bad Dog Multipurpose Drill Bits, you’ll be ready for anything. Stop wasting time swapping bits or chipping expensive tile. Grab the one bit that does it all and get the job done right the first time.
Who We Are
I'm JJ Strong, a mechanical engineer and third-generation at Bad Dog Tools. We’re a family-run, American-made company with over 30 years of experience in designing and manufacturing multipurpose tools. We’ve spent decades traveling to trade shows, listening to pros, and testing our tools the hard way—by breaking stuff, learning, and building better. When we give drilling advice, it comes with thousands of holes' worth of trial and error behind it.
Written by JJ Strong
Mechanical Engineer & Third-Generation Tool Designer at Bad Dog Tools
Frequently Asked Questions
What’s the best drill bit for tile?
For most tile jobs—especially when drilling through both tile and whatever’s behind it—the Bad Dog Multipurpose Bit is our top choice. It handles ceramic, porcelain, glass, and common backers like cement board and studs without needing to swap bits.
Can I drill tile without cracking it?
Yes, if you use the right technique: light pressure, slow speed (especially at the start), and water to keep things cool. Porcelain and glass are the most prone to cracking.
Do I need to use water when drilling tile?
Water helps prevent heat buildup, which can crack tile or harden it mid-drill. It’s especially important when drilling porcelain, glass, or using diamond hole saws.
What kind of drill should I use?
A standard corded or cordless drill in rotary (non-hammer) mode works best for tile. Hammer drills should only be used after clearing the tile layer—mainly for masonry or thick stone.
How can I tell what kind of tile I have?
Ceramic scratches easily and has a rough back. Porcelain is denser, heavier, and has a smooth back with consistent color all the way through. Glass is glossy and translucent. Stone has visible texture or veining and natural variations.