Biter / Clamp How To
The Basics - Our Tool, Your Drill, Anywhere you want to go...
Chuck up the Bad Dog Biter in any hand drill - corded or cordless - and it's instantly transformed into a sheet material cutting machine. Loosen the set-screws on the face of the tool 1/4 turn to enable the patented steerable heads, and cut patterns with ease.
Getting Started
Videos
Power Source: Any Hand Drill Corded or Cordless
Speed: 1,200 – 4,500 RPM - The faster the drill the faster the cutting speed
Cutting Opening Width: 1/8″
Maximum Thickness per Material:
Mild Steel* : 14 gauge
Stainless Steel* : 18 gauge
Brass/Copper/Aluminum : 14 gauge
Plastic & Fiberglass : 3/32″
Laminate & Veneer : 3/32″
*use on flat or corrugated stock/cutting oil is recommended for maximum blade life. Minimum cutting speed 2,000 RPM
Step by Step:
- One or both heads can be set to steerable
- Turn the screw 1/4 turn using allen wrench provided
- The Head should turn freely but still be snug. Lock Tite can be used to secure set screw.
- Bring drill to maximum RPM before cutting material
- Keep speed constant while cutting
- Don’t force Biter to cut faster
The Long Dog Biter allows you to reach material while being up to 6 inches away from it. - Perfect for working on the firewall in your car.
Also great for any kind of HVAC work where you need to make cuts but your tool will not fit into the duct work.
How to Change Biter Blade
1. Remove metal retaining clip (A).
2. Remove the plastic end cap (B).
3. Loosen lock nut (C) & remove attached set screw (D) with allen wrench.
4. Insert new blade (E) with indentation facing up while gently pushing old blade through and out.
5. Align indentation in center of blade block (F).
6. Replace set screw (D) into indentation in new blade..
7. Re-tighten lock nut (C)
8. Grease
9. Replace end cap (B) & retaining clip (A).
How DO I Cut ____ ?
Videos
What Materials Can A Biter Cut?
Mild Steel - Up to 14 gauge
Stainless Steel - Up to 18 gauge
Copper - Up to 14 gauge
Brass/Bronze - Up to 14 gauge
Aluminum - Up 14 gauge Use cutting lubricant
Acrylic & Plexiglass - Up to 1/8"
Fiberglass - Up to 1/8"
Wood Veneer - Up to 3/32"
Cork - Up to 1/8"
Laminate - Up to 1/8"
Leather - Up to 1/8"
Polystyrene - Up to 3/32"
Vinyl - Up to 1/8"
Formica - Up to 3/32"
Paper - Up to 1/8"
Fiberglass - Up to 1/8"
Plastic - Up to 1/8"
Biter Accessories
How-To Make Circles with the Biter LEASH
Off leash, the Bad Dog Biter Drill Mounted Sheet Material Cutter cuts like a champ. Freehand just about any design.
But sometimes tolerances demand laser-straight cuts or precise curves.
That’s when you snap on the Bad Dog Biter Leash.
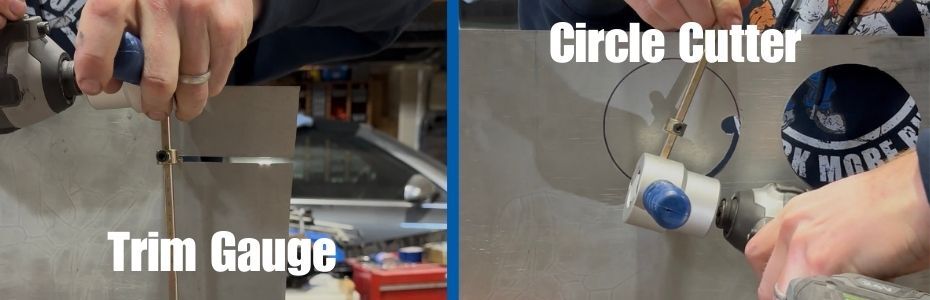
The Leash works as both a trim gauge and a circle-cutting jig for straight lines in sheet metal, or arcs and circles up to 12" diameter. If you’re cutting ducts, doing bodywork, or fabricating custom panels, the Leash helps you cut faster, cleaner, and more precisely — every time.
What the Biter Leash Does
The Leash is a three-piece set that utilizes a threaded cutting head which holds a 6" hardened rod with an elongated stylus.
For trim work, the stylus glides along the edge of rigid sheet material so you can reproduce matching cuts with dead-on consistency.
Need an arc or circle? Anchor that same stylus in the center of your material and rotate the tool smoothly
for amazingly accurate arcs and circles from 2" up to 12" diameter.
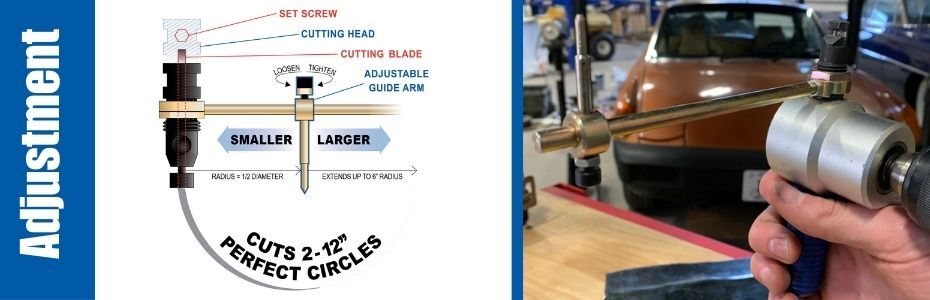
- Radius = 1/2 diameter
- Extends up to 6" radius
- Cuts 2–12" perfect circles
Straight cuts. Perfect arcs. No guesswork.
Installing Your Bad Dog Biter Leash
Easy as 1-2-3
- Loosen the set screw and remove the cutting head, leaving the central cutting blade in place.
- Place the Biter Leash circle cutter over the blade and tighten the set screw.
- Adjust the guide arm’s position to create perfect circles or straight trim cuts.
Slide the adjustable guide arm inward for smaller circles. Extend it outward for larger ones.
For circle cutting, anchor the stylus at center and rotate steadily.
For trim work, let the stylus ride the sheet edge and keep smooth forward pressure.
That’s it. One set screw. Quick swap. Back to work.
Videos
Biter Projects
Videos